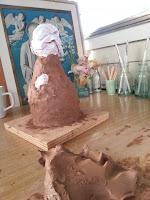
I made a stand to support the clay while working. The stand is next to my helm to compare heights. In this picture the stand is too tall.
The image on the left shows the height of the original stand - too large. I would like the crest to sit at the height shown in the second image, so the stand was trimmed.
I used paper and thread to create the basic form of the model. This reduces the amount of clay in the item. If I choose to fire the model it is important to have the walls of even thickness, without air pockets and with good air flow. A solid item of this size will not dry evenly, may crack during the drying process and is not likely to fire without issue. The model can be slid off the wooden stand and the paper pulled out.
The shoulder of this paper model is higher than the base so it can be trimmed to fit the shape of the helm crown.
The clay was worked to ensure an even texture and the removal of any air pockets.
The clay was pinched off and formed around the base of the model. It was necessary to ensure the walls had an even and sufficient thickness.
The basic badger shape is roughed out.


