Saturday, 12 October 2013

Clothing for 1420-1482: A veil style

1. This method uses two large square veils. Place the first veil on your forehead, just below the hairline.

2. Wrap and pin the veil in place.

3. Roll/fold up the tail of the under veil, to help create bulk at the back of the head.
 

4. Pin this roll up so it is clear of the neck.


5. Centre the second veil so it is slightly further up the forehead than the first.

6. Use a large pin to secure the two sides of the veil at the nape of the neck. Make sure the head of the pin faces down and the point angles slightly away from the head. Make sure this is tight.

7. Find the centre line of the second veil, a few inches up from the hanging hem.


8. Pin this above the forehead.


9. Use more pins to arrange the veil into a whole range of rumples and bumps, as seen in various illustrations from 1450, especially those of Rogier van der Weyden.

Clothing for 1420-1482: One outfit from 1450

Here is an outfit I wear regularly. It is based on images from 1450 in Franco-Flemish artwork. Last weekend I attended a 3-day camping event - it was hot so I wore the layers up to the kirtle, without sleeves. Yesterday, I presented a unit, for a school group, on life in the Middle Ages - these photos were taken straight after that event.

First layers 
Smock/sherte - Linen with embroidered neckline and cuffs. A high scooped neckline without embroidery would be more common in most lower to middle class outfits.

Shoes - These leather poulaines are by far my most comfortable shoes. It took a few events to get used to walking, as the soles are very slick and the pointed toes collect long grass. Now, they are by far my favourite to wear. They have been worn in all weather, including under ankle deep water and mud at a very wet Great Northern War. A great purchase!

Hosen - woollen knee high hosen. The garter is unnecessary for this pair and was only being worn to as part of the demonstration.

Veil - this headwear is a combination of two veils. It is a middle class style, and can be altered to many other styles, by ruffling the outer veil and pinning into different bumps. I will detail the method in another post.


Structure - underskirt
This under skirt adds structure to the kirtle skirt. It keeps my legs warm and creates a solid base for the kirtle. There is less evidence in the mid 15th C in the low countries for this layer. It appears to be a common French practice of the time to wear multiple long sleeve kirtles at once, negating the need for the underskirt. It was 37 degrees Celsius last time I wore this outfit, so I must admit that it is a very rare event (maybe once a year) that is cool enough to wear multiple full sleeve kirtles. This layer is a compromise, rather than a strict reconstruction.


Kirtle layer
The green kirtle is laced in the front, using solid brass rings. When put on, it laces smoothly. After wearing it for a day, the lacing shifts to gap over the bust. The skirt is tucked up, as seen in illustrations of ladies working in doors. Those working in fields often only show the kirtle layer, and are tucked up to bare the lower legs for ease of movement. I wear a small purse on my belt - there are images in Boccaccio's Decameron of two girls with pouches in this position. There are other images of women with purses hanging on the kirtle layer, showing beneath their lifted gowns. These other styles seem to hang more to the sides, and do not show their attachment to the belt or kirtle. The sleeves are pinned on, and come in a range of colours and materials. None for dirty kitchen work, rich silk brocade for under a gown with hanging sleeves.

Gown
This black woollen gown is in the middle class houpeland style. It originally had a fur lined bodice, but it turned out to be too hot. The fur is now a trim around the neckline and cuffs. 


Monday, 30 September 2013

Leather helm crest: Part 6 Preparing gesso sottile


About a week ago, I started to saturate some plaster of Paris to make gesso sottile. This is the second layer of gesso that Cennino Cennini recommends for the outside of a helm crest. In an earlier post I explored the chemical composition of gesso. Gesso sottile is a super hydrated version of plain plaster of Paris. By soaking the plaster, you are allowing it to take on more H2O (water), giving it the desirable property of a slower drying time. This means we will be able to add the final sculpting touches with more care.

Since this is the first time I have used plaster in this way, to sculpt rather than to make moulded objects, it is all a learning experience. I have no idea how well the plaster will stick to the leather, or how well the second layer of plaster will stick to the first, or how the paint will need to be applied. It will also be the first time I have made pigment based medieval paints. There will have to be some test pieces very soon...

Cennini suggests leaving your plaster to soak for 30 days, changing the water to ensure it remains clean. Other sources say this method is inexact - but it is the best evidence I have, closest to my chosen time period, so I have tried this method first. We can always try something else.

To make gesso sottile, I fill a bucket with water and poured plaster in. It is always recommended that you add plaster to water, not water to plaster. When making a gravy or sauce, this produces lumps but for plaster it works well. I mixed it gently and continued to add plaster until it was not absorbed immediately. I covered the bucket with another tub to stop rain, cats, frogs and leaves getting in. Now, we wait.

Friday, 27 September 2013

Leather helm crest: Part 5 Cennini's sand

To attempt Cennini's leather forming method, I have filled the stitched leather structure with wet sand.

In the section marked 'CLXIX How to Model Crests or Helmets.[211]'
Cennini suggests that after drawing up your model design...
"And draw [p. 108] two of them, and sew them together; but leave it open enough on one side so that you can put sand into it; and press it with a little stick until it is all quite full. When you have done this, put it in the sun for several days. When it is quite dry, take the sand out of it ."

Steps
1  "draw two of them" - I have used more than 2 pattern pieces to form a 3D shape. It is possible that Cennini intends that only very simplistic forms are made from the leather with all protuberances, such as ears, chins, arms and legs, being formed from the gesso grosso layer. I chose to go with the second interpretation, which forms more of the final shape from multiple leather pieces, since this design would add a considerable weight of plaster/gesso for final shaping, otherwise. I guess this just means I have more alternatives to try on future crests.


2  "sew them together" - Done


3  "but leave it open enough on one side so that you can put sand into it" - If I were making a full animal to stand on top of a helm, Cennini's method would help make a  fully formed body shape. Since I am using a head as the base structure, it was possible to have a large opening at the base of the neck to fill with sand. I plan to form a leather cap on the crown of the helm, and stitch this to the lower edge of the neck. As I did not want this leather cap to deform from the wet sand or pushing with a stick, I chose to add it after the main structure is dry.

4  "you can put sand into it; and press it with a little stick until it is all quite full"  - Done. I could have used beach sand, but did not want to have to rinse the salt and impurities from it, and some beaches locally are protected by State and National Park. Further more, while recently living in a coastal town, I worked alongside and became good friends with some women who were Indigenous Australians - they have taught me that it is important to seek permission from the local custodians of the land before removing anything, including sand. Buying sand was a compromise because I could not gain permission to take from local beaches, and this at least gave me the possibility that the sand may have come from somewhere with permission. Yes, I am an optimist.


You can see the colour difference from the left image, with the dry leather, to the right image, which is now packed with wet sand. It took a bit of shaping to get the top to sit in an oval. Next time I would make a wooden disc to fit inside the top to hold the shape.


5
"put it in the sun for several days" - Done. I am not sure it will stay seated where I have put it to rest, so I may need to find a way to chock it up without putting pressure on the outside and changing the shape.

6
"When it is quite dry, take the sand out of it ." - Waiting, waiting...


Sunday, 22 September 2013

Leather helm crest: Part 4 leather hardening

http://www.britishmuseum.org/explore/highlights/highlight_objects/pe_mla/a/archers_bracer.aspx

This item is made from leather and has been hardened using water, in a technique known as cuir bouilli. I wonder if the wet sand suggested by Cennini can be made to create hardened leather in this way?

Clothing for 1420-1482: clothing hook and eyes - Where are they?

http://www.colchestertreasurehunting.co.uk/D/dressfasteners.htm

The page above is for a metal finds group in England. What I see on their page is 2 pairs of 17th century hooks and eyes that look very similar to both modern hooks and eyes and those I have seen from the 15th and 16th c. What I also see is a huge gap in their items - where are the 15th century finds?

Leather helm crest: Part 3 leather pattern

After making the clay badger model for the crest, I let it dry for a day. On the second day the leather was firm enough for me to use some wood carving tools to finish the detailing and clean up the model. It would have been possible to cover the wet clay in a plastic bag and keep it moist for up to a week, but it wasn't necessary this time.

Before cutting up leather to make the crest structure, I will make a pattern. I chose to use felt, as it has only slight give and is easy to stitch.

I began by cutting a few pieces into manageable sizes with overlaps of at least an inch. The overlaps were trimmed down as I joined the pieces, so the excess fabric did not affect the pattern's ability to wrap. You can see the threads I used to tie the basic pieces onto the body first. I started to stitch from the nose back, using fairly long stitches in a contrast colour thread.

The ears were freed by cutting a split in the head pieces. These holes will be unnecessary in the leather model, as I plan to attach the ears to the outside of the head using separate pieces. 

Once the rough cover was pulled together, I trimmed the seams further and went back to tighten up any loose or puckering areas. 


Once all of the pieces fitted reasonably well, it was time to open the pattern pieces out. I wanted the finished item to be around the same size as the clay model. Since the felt pattern was made over the clay model, it was bigger than needed, and since plaster / gesso would be layered over the finished leather structure, the pattern pieces needed to create a smaller item than the felt cover. This was achieved by cutting on the stitch seams and not adding a seam allowance back in. 


The black lines are placement markers to help put the pieces back together. I numbered the pieces and transferred the felt pattern onto heavy card. Each piece was labelled and is stored in a bag. To keep my patterns neat, I like to mark them with-
* The item name
* The owner's name
* The date of creation
* If there is a seam allowance (SA) or not. If so, how much on each side, as certain sides of a garment often get different SAs.
* Number of pieces
* Description of the pieces (CF= centre front etc)
* Any placement marks
* Indicate any folds ( v--------------v)


I was planning to sew the leather with butted joins, so no seam allowance would be needed. I was only looking to make a rough structure from leather, with all of the texture done in gesso grosso and all of the surface detail completed in gesso sotile.

 In order to create a slightly smaller leather item, not exactly the same size, the pieces were trimmed a few millimetres in from the pattern pieces on the leather. I have chosen to try a piece of leather that is 2 - 3mm thick (slightly more pliable than belt leather). The pattern was inked on, as it should be covered by the gesso. The leather was also chosen because it is marked, making it less useful for other projects. I am hoping the water hardening and plaster layers will firm it up. I considered doing some tests but since structural integrity cannot be simply scaled up, doing tests on smaller pieces would not be truly indicative of the finished strength, and full size tests would be very costly. I still hope to do some striking tests with the plaster layer, at a later date.


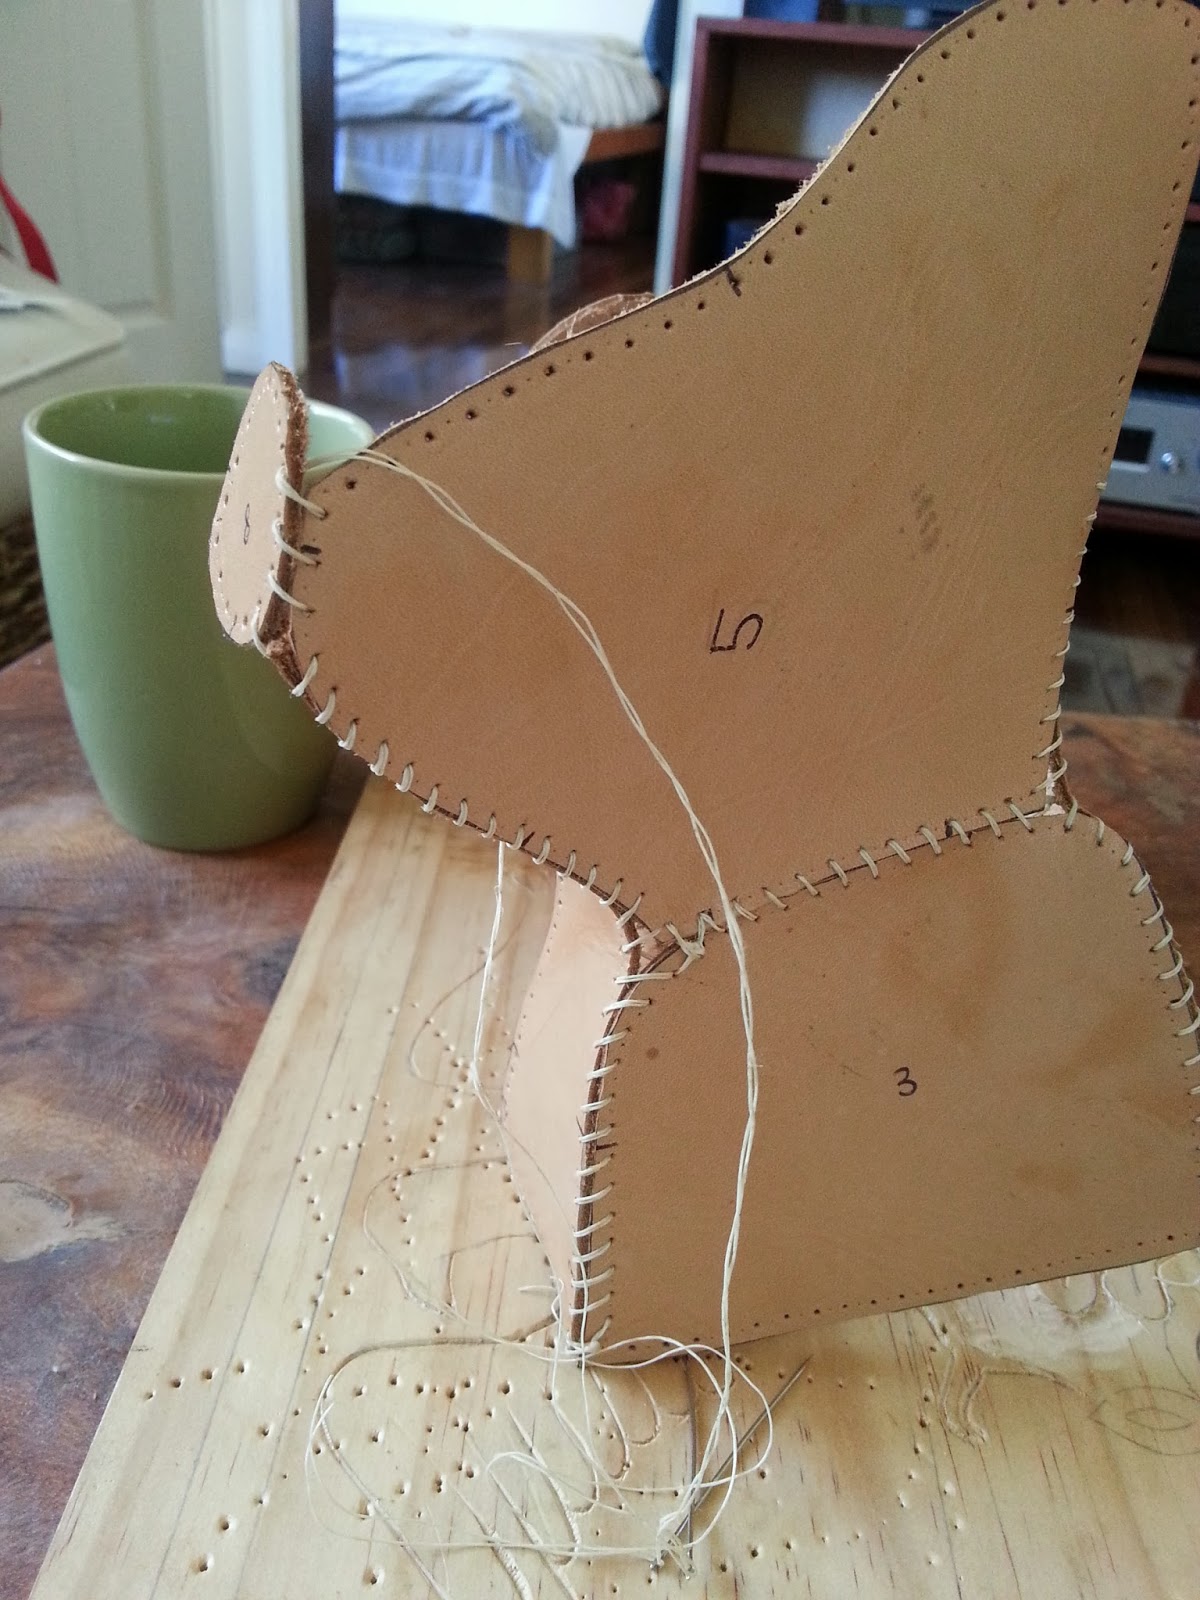
The holes were marked with a rotary tool and every second spot was pierced with an awl. I will stitch through these holes. Again, it is not necessary to make a perfectly neatly stitched item, as all stitching will be covered in plaster. On future items, I would love to refine the process and do fine work at every level. Spacing the stitches out serves another purpose - since the stitching is tensioned and retensioned as each new piece is attached, the looser, longer stitches are more suited to tacking. In fact, short, neat, overlapped seams or saddle stitching would make the assembly process harder. 


Starting with the larger pieces, I lined up some of the placement marks and began to sew. The curved needle is helping to secure pieces at the placement marks until I stitch up to that point. Because there are very few corners and straight lines, it is a bit tricky to know how far to curve and sew each piece to the next. For this reason, I had 3 - 4 needles on the go.

First, I joined the front and the pieces from one side. Then I attached the nose and worked back from there.

Once the body was attached right around (in a box), closed as much as possible of the head. At this point, I was working with a hand reaching either through the head or through the base for most stitches. I attached the ears separately and closed the head.

The ears were trimmed to look less like a teddy bear and the sewing was complete on the basic leather structure.The next step will be to stuff them with wet sand and wait until it all dries.